In this tutorial we’ll walk through how Pocket deploys the Prefect data pipeline framework to ECS.
Why Pocket chose to use Prefect
Pocket is a part of Mozilla where we empower people to discover, organize, consume, and share content that matters to them. Our data is relatively small in size, but for a small team, we do support a lot of products with various data needs. For years, Pocket used Astronomer Airflow and in-house solutions side-by-side to run data processes. While Airflow is a very powerful tool, our engineers experienced a steep learning curve. Not to mention our in-house solutions, which suffered from a lack of observability.
After reviewing our options, we concluded that Prefect was the best long-term solution to support Pocket’s needs. What we like best about Prefect is how easy it is to pass data between tasks: it is as simple as passing the return value of one task into a parameter of another, just as you would for any other Python program.
Solution Architecture
The table below outlines the decisions that we took in deploying Prefect.
| Decision | Reason | |
|---|---|---|
| Execution environment | AWS ECS Fargate | ECS allows long-running jobs based on Docker images. |
| Application code storage | Custom Docker image | Storing code in a Docker image allows our local development environment to match production as closely as possible. |
| Infrastructure as code | CDK for Terraform (typescript) | Writing infrastructure in a language that developers are already familiar with gives us control over our data infrastructure, without having to depend on dev-ops. |
| Continuous deployment pipeline | AWS CodePipeline/CodeBuild | We consider this the most secure way to automatically build our infrastructure. |
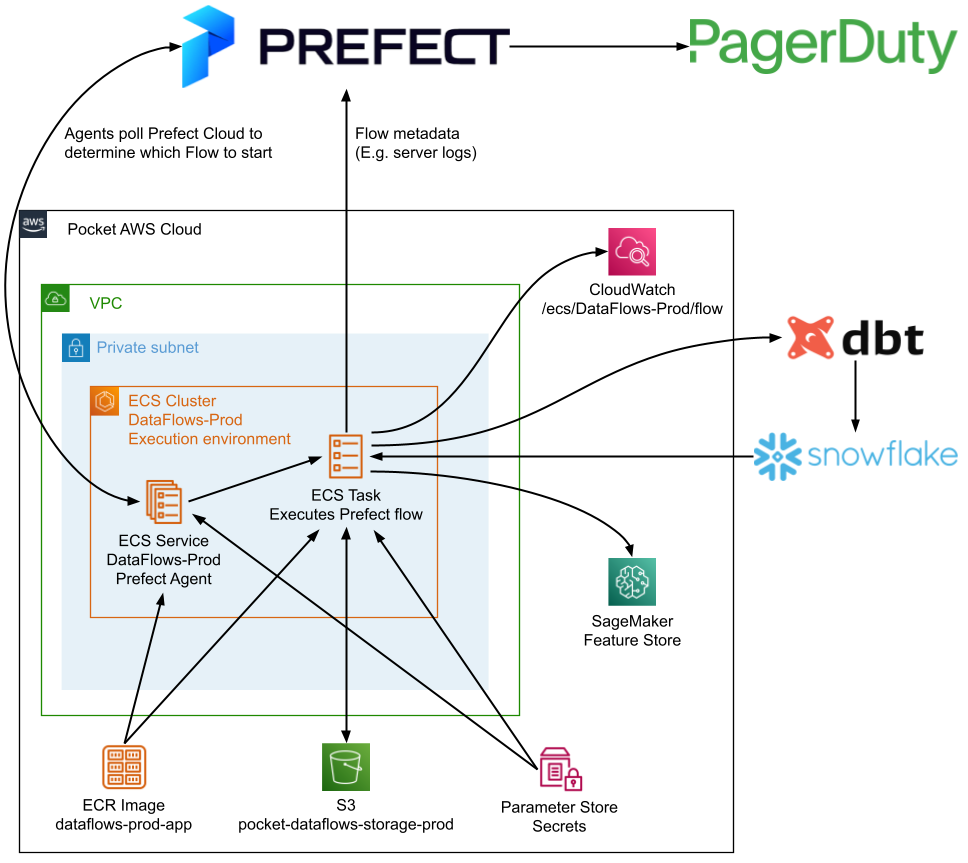
Security considerations
Our use of Prefect (see architecture diagram below) has several security benefits:
- Our Prefect Agent and Flows are deployed in a private subnet, such that they’re not publicly accessible from the internet.
- We follow the principle of least privilege, by only giving roles the access that they need. For example, the Prefect Agent only has permission to start tasks in its own ECS cluster.
- Prefect never receives personal user data. It only knows about the structure of our data flows, and when to schedule them.
Prerequisites
Accounts that you’ll need to register for:
- Prefect account (free)
- AWS account with a VPC (we’ve previously written a guide for creating a VPC)
- Terraform Cloud account (free), for storing the Terraform state file
- Docker Hub account (free), to prevent getting rate-limited while downloading Docker images
Tools that you’ll need to have installed:
- NodeJS/NPM
- Terraform CLI
- AWS CLI
- Docker
Optionally, if you’re new to CDK for Terraform, it might be helpful to watch our YouTube workshop where we show how to deploy a simple service to ECS using CDK for Terraform. We even built helpful abstracted constructs for you to use!
Tutorial
The steps below deploy Prefect to your AWS account. Our repo supports deploying to a ‘development’ and ‘production’ AWS account. In this tutorial we’ll only do the former. If you get stuck, feel free to ask me (@Mathijs Miermans) a question in the public Prefect Slack.
Step 1: Fork Pocket/data-flows
- Go to https://github.com/Pocket/data-flows/ and click the ‘Fork’ button.
- In your terminal,
git cloneyour forked repo. - Run
git checkout -b tutorial-deploymentto create a new branch.
Step 2: Laying the foundation for continuous deployment
At Pocket, we have fully automated creating new services. For this tutorial, we’ll need to manually create a few resources in AWS to kickstart continuous deployment.
2.1. Create a CodeStar connection to Github
You can skip this step if you already have a CodeStar connection with access to your forked data-flows repo.
- Go to CodePipeline > Settings > Connections
- Click ‘Create Connection’ and follow the directions
2.2. Create a CodeBuild project called DataFlows-Dev (see screenshot below)
- Project configuration
- Project name = DataFlows-Dev
- Source
- Source provider = Github
- Select ‘Connect using OAuth’, click ‘Connect to Github’, and authorize aws
- Repository = Public repository
- Repository url = your forked repository
- Source version =
dev
- Environment
- Environment image = custom image
- Environment type = Linux
- Image registry = Other registry
- External registry URL =
hashicorp/terraform:1.0.11 - Registry credentials =
Shared/DockerHub(we’ll create this secret in the following step) - Service role = New service role
- Leave the ‘Role name’ as-is
- Buildspec
- Choose ‘Use a buildspec file’

2.3. Attach the ‘AdministratorAccess’ policy to the CodeBuild IAM role
CodeBuild created a role called codebuild-DataFlows-Dev-service-role. This role requires broad permissions because terraform needs to create various resources, including IAM roles.

2.4. Create an SNS topic named Deployment-Dev-ChatBot
This SNS topic is required to exist for deployment to succeed, but we won’t use it for this tutorial. You can choose to subscribe to this topic to be notified when deployments happen.

Step 3: Modify source code
Open .aws/src/config/index.ts in a text editor to make a few changes:
- Change
s3BucketPrefixfrompocketto your organization name. - Change
domainto domain names that you own. You only need to change the case whereisDevisfalsefor now because this tutorial deploys to the ‘development’ environment. - Change both ARNs in
githubConnectionArnto the ARN of the CodeStar connection that you created in the previous step. - Change the
dataLearningBucketNameto an S3 bucket that you’d like your Prefect flows to have read and write access to. At the end of this tutorial, we’ll run an example flow that downloads something from this bucket as an end-to-end test. - Remove all values in the
parameterStoreNameslist. After completing this tutorial, this is where you could put any credentials you want to securely inject as environment variables into your Prefect flow. - Change the
awsRegionfromus-east-1to the region that you’re deploying to. - Change
repositoryfrompocket/data-flowsto the name of your forked repository. - Change
codeDeploySnsTopicNametoDeployment-${environment}-ChatBot, to match the name of the SNS topic that you created in the previous step.
Source code for Flows is located in the src/flows/ directory of your forked repo.
- Delete all files in
src/flows/exceptsrc/flows/example/s3_download_flow.py. - Open
src/flows/example/s3_download_flow.py, and modify thes3_bucket_sourceands3_bucket_keyto point to a key in the s3 bucket that you setdataLearningBucketNameto in.aws/src/config/index.ts. - Optionally, you can put your flow files in src/flows at this point.
Your changes by now should look something like the screenshot below.
Commit your changes to your branch, for example: git commit -a -m “Configure custom deployment” && git push origin tutorial-deployment. Force push your changes to your dev branch: git push -f origin tutorial-deployment:dev.

Step 4: Create a Prefect ‘dev’ project and API key
In Prefect Cloud, create a project called ‘dev’.
- Go to the Service Accounts page in Prefect Cloud and click on ‘Add Service Account’.
- Create an API Key for this service account.
- Go to the AWS Systems Manager Parameter Store in the AWS Console, and create a parameter named
/DataFlows/Dev/PREFECT_API_KEYof typeSecureStringand ‘Value’ set to the Prefect API Key.
Step 5: Create Terraform Workspaces
Create two workspaces called DataFlows-Dev and DataFlows-Prod. Both are required to exist for the deployment to succeed, even though we’ll only write Terraform state to DataFlows-Dev for this tutorial.

For both workspaces, change ‘Execution Mode’ in general settings to ‘Local’:

Step 6: Storing secrets and parameters in AWS
6.1. AWS Systems Manager Parameter Store
Create parameters in the AWS Systems Manager Parameter Store according to the following table. /DataFlows/Dev/PREFECT_API_KEY was created previously during step 4 and is listed only for completeness. If you don’t yet have a VPC with private and public subnets, you can create one using our VPC guide.
| Parameter name | Type | Value |
|---|---|---|
| /DataFlows/Dev/PREFECT_API_KEY | SecureString | Prefect API key |
| /Shared/Vpc | String | VPC id |
| /Shared/PrivateSubnets | StringList | Comma-separated private subnet ids |
| /Shared/PublicSubnets | StringList | Comma-separated public subnet ids |

6.2. AWS Secrets Manager
Store a secret in the AWS SecretsManager called ‘CodeBuild/Default’ with keys:
- terraform_token = Terraform API token (Create one in User settings > Tokens)
- pagerduty_token = <empty string>
- github_access_token = <empty string>
Create a secret in the AWS SecretsManager called ‘Shared/DockerHub’ with keys:
- username = Dockerhub username
- password = Dockerhub token (Create one in Account Settings > Security)
Step 7: Doing an initial, manual Terraform deployment
On subsequent deployments, our infrastructure changes will automatically be deployed when running the AWS CodePipeline, but this CodePipeline does not exist yet. It’s a common ‘chicken-or-the-egg’ problem in continuous deployment. At Pocket, we’ve solved it by automatically running CodeBuild (the one we just created) if CodePipeline doesn’t exist.
For this tutorial, we’ll run CDK for Terraform in a terminal:
cd .awsto go to the .aws/ directory located in the project root of your forked repo.- (optional) If you have
nvminstalled, runnvm useto switch to node v16. npm cito install dependenciesnpm run build:devto build and transpile typescript code to javascript and synthesize to terraform friendly JSON.cd cdktf.out/stacks/data-flowsto go to the directory with Terraform code.terraform loginto login to your Terraform account, if you’re not logged in already.terraform initto initialize Terraform. Choose the dev workspace when prompted.terraform applyto deploy your stack to AWS. Confirm with ‘yes’ when prompted. It should take about 10 minutes for the deployment to finish.
Step 8: Building and pushing the Docker image
We’ve configured Prefect to store our code in a Docker image. We consider this more reliable than storing code on S3 because code is accessed in the same way during local development and production. The downside is that we need to build the Docker image every time we deploy to AWS, but continuous deployment takes care of this automatically at Pocket. For this tutorial, we’ll build and push the Docker image manually:
- Go to the ECR repository called
dataflows-dev-appand click on ‘View push commands’. - Go to the project root directory in a terminal.
- Copy and run the first push command to authenticate ECR with Docker.
- Instead of the second push command (starting with
docker build), run this:docker build -t dataflows-dev-app --file .docker/app/Dockerfile . - Run the third and fourth push command as AWS suggests to tag and push the image.
Go back to the AWS console, click on the refresh button in the dataflows-dev-app, and confirm that an image got pushed called ‘latest’.
Step 9: Triggering the CodePipeline
At this point, everything is set up to deploy the Prefect Agent to ECS. Go to DataFlows-Dev-CodePipeline and click on ‘Release change’. The pipeline consists of three stages:
- Source downloads the source code from Github and stores it as an artifact on S3.
- Deploy consists of two actions:
- Deploy_CDK creates infrastructure in AWS by running
terraform apply. - Deploy_ECS does a blue/green deployment of the Prefect Agent on ECS.
- Deploy_CDK creates infrastructure in AWS by running
- Register_Prefect_Flows registers flows defined in src/flows with Prefet Cloud.
It’ll take about 10 minutes for the CodePipeline to finish running, after which it should look like the screenshot below.

Step 10: Test the setup by running a flow from Prefect
Go to the ‘dev’ project in Prefect Cloud. The flows in Prefect should match the ones in the src/flows directory. Go into the flow examples/s3_download_flow click on ‘Quick run’ to try it out. It should succeed if the S3 bucket and key that you provided are present.

Next steps
Congrats if you followed all steps! At this point, we have a secure, scalable Prefect deployment, with the beginnings of continuous deployment.
Clean up AWS resources
If you’re done with this tutorial and don’t want to incur any further costs from AWS, here’s how to delete all AWS resources created as part of this tutorial:
- In the AWS console, search for an S3 bucket name containing
dataflows-resultsand delete it. cd cdktf.out/stacks/data-flowsto go to the directory with Terraform code.- Run
terraform destroyto destroy all resources. - Terraform should respond with “Destroy complete!” after a few minutes. Try running
terraform destroyagain if you get an error such aserror deleting Target Group: ResourceInUse. - In the AWS console, delete resources that were created manually:
- The SNS topic
Deployment-Dev-ChatBot - The CodeBuild project
DataFlows-Dev - The IAM role
codebuild-DataFlows-Dev-service-role - Two IAM policies containing
CodeBuildBasePolicy-DataFlows-Dev
- The SNS topic
Complete continuous deployment
For this tutorial, we manually pushed the Docker image and triggered the CodePipeline through the AWS console. At Pocket, the deployment happens automatically in CircleCI when commits are merged into our dev or main branch. While we like that CircleCI ‘orbs’ make it easy to share code across services, having to coordinate between CircleCI and CodePipeline is a challenge. Instead, you could add a stage to the CodePipeline that pushes the Docker image. To get started, look at how our repo adds a CodePipeline stage to deploy flows to Prefect Cloud.
Create separate staging and production environments
We created a single environment in this tutorial, that is linked to the ‘dev’ branch of your forked repo. To create a production environment, follow this tutorial again in a different AWS account, and point it to the main branch of your forked repo. By default, production flows will be deployed to a Prefect project called ‘main’.
Tagged with: #Prefect, #CDK, #Terraform, #AWS